Brisket on a Budget: Stop Burning Money on Bad Cuts (The Honest Dad’s Guide)
Real brisket — full packer, prime grade, 14 pounds of beef — costs more than a tank of gas these days. You haul it home, plug 12 hours into the smoker, fight your way through the stall, finally slice into it… and the flat is dry, the point is great, and you just spent $130 plus a Saturday on a meal that mostly disappointed you.
Welcome to brisket. The meat that taught a generation of dads humility.
Here’s the thing nobody at the meat counter tells you: most of what makes brisket great isn’t the cut — it’s the cooking. Slow heat, controlled moisture, time, and respect. Apply the same principles to a $20 chuck roast or a $30 bottom round and you’ll get 80% of the brisket experience for 25% of the cost. Apply it to a discount-priced choice-grade brisket flat and you’ll beat your neighbor’s prime brisket on the regular.
This is the no-nonsense breakdown. Why brisket is so expensive. The cuts that cook like brisket for a fraction of the price. How to pick a good piece of meat at any tier. The trim, prep, and cook process that turns budget cuts into Sunday dinner. And the marketing traps that get dads paying premium for cuts they don’t need.
The 30-second answer
For real budget brisket: buy a choice-grade flat (not packer) on sale, $5–$8 per pound. For brisket-style results without the brisket: buy a chuck roast or bottom round at $5–$7 per pound and cook it low and slow with the same technique. Skip “wagyu brisket” at $20+ per pound unless you have rich relatives. Most of brisket’s reputation is technique, not breed.
What actually makes brisket “brisket”
Brisket is the chest muscle of the cow. It works hard, it’s loaded with collagen and connective tissue, and it has two parts:
- The flat: leaner, more even thickness, harder to cook because there’s less fat to keep it moist.
- The point: fattier, marbled, almost foolproof. The “burnt ends” come from this part.
What turns this into the meat people drive across state lines for is the slow break-down of collagen into gelatin. Hold the meat at 200–225°F for 8–14 hours and the tough connective tissue dissolves into mouth-coating richness. The fat renders, the muscle fibers separate, the bark sets, the smoke gets absorbed.
The magic is the time at temperature, not the brand of cow. Same chemistry happens to any tough cut with enough collagen — chuck, bottom round, top round, eye of round, pork shoulder. Brisket is just the most famous example.
Why brisket prices have gone insane
A few things stacked up:
- BBQ competitions and Texas-style barbecue went mainstream in the 2010s.
- Restaurant demand pushed wholesale prices up.
- The “prime grade” label became a marketing target — people pay more for the USDA grade even when choice is fine.
- Every food show in the last decade featured brisket as the holy grail. Reputation drives pricing.
What this means for the home cook: prime full packers at Costco are now $6–$8 per pound on a good day, $10+ when supply tightens. A 14-pound packer at $8/lb is $112. Throw in pellets, rub, time, beer, and the inevitable “I should have got it 30 minutes earlier” moment, and you’re looking at a $150 meal.
That math has to make sense for a special occasion. For a weeknight or a casual Saturday, there are smarter cuts.
The five best brisket alternatives
1) Chuck roast (the easy winner)
Cut from the shoulder, marbled with fat, packed with connective tissue. Often $5–$7 per pound. Cooks faster than brisket (4–6 hours vs 10–14) because it’s smaller (3–5 lbs vs 12–16). Forgiving as hell — you’d have to actively try to dry it out.
Cook it like brisket: trim minimal fat, season heavily, smoke at 225°F until internal hits 195–205°F. Wrap in butcher paper at 165°F if you want a softer bark. Rest 45 minutes. Slice against the grain.
Result: “poor man’s brisket” that some pitmasters quietly prefer over real brisket. Especially good for sandwiches, tacos, and chili.
2) Bottom round (the lean overachiever)
Cut from the rear leg. Lean — almost too lean — but full of collagen. $4–$6 per pound. Smaller than chuck, leaner than brisket, somewhere between roast beef and brisket in texture when done right.
Cook it like brisket: needs more attention to moisture. Inject with beef broth or wrap earlier (around 150°F internal). Pull at 200°F internal. Rest 30 minutes.
Result: sliceable, sandwich-perfect meat with a clean beefy flavor. Not as rich as brisket, but lower-fat and surprisingly satisfying.
3) Beef cheeks (the secret weapon)
Hard to find, but if your butcher carries them: $7–$10 per pound. Pure collagen and connective tissue. Cook like brisket and they turn into the most tender, gelatinous beef you’ll ever eat. Used in high-end Mexican (barbacoa) and barbecue circles for years.
Cook them like brisket: smoke at 225°F until internal hits 200–205°F. Usually 5–7 hours. Wrap in foil with a splash of beef broth at 165°F for extra moisture.
Result: melt-in-your-mouth pull-apart beef perfect for tacos, sliders, or on rice. Smaller portions, but every bite is rich.
4) Pork shoulder (the gateway smoke)
Not beef, but cooks under the same principles. $3–$5 per pound. 6–10 lbs typical size. Forgiving, flavorful, feeds a crowd.
Cook it like brisket: 225°F until 200°F internal (or 205°F for full pull-apart). Wrap at 165°F. Rest at least an hour.
Result: pulled pork that beats anything most barbecue restaurants serve. Easier than brisket, cheaper than brisket, more crowd-friendly than brisket.
5) Choice-grade brisket flat (the budget brisket)
If you specifically want brisket but can’t afford prime: a choice-grade brisket flat at $5–$8 per pound is the smart compromise. Smaller (4–6 lbs vs 12–16), no point (the easier-to-cook fattier section), less margin for error, but real brisket flavor.
Cook it: same as full brisket but watch internal temp closely after 6 hours. Wrap at 165°F to protect against drying. Pull at 200°F. Rest 1 hour minimum.
Result: real brisket flat for half the cost of a packer, with a steeper learning curve because there’s no point to fall back on.
How to pick a good piece of meat (any cut)
Most home cooks pick the cut that’s biggest, prettiest, or whatever their dad always bought. There are better criteria.
Marbling
Look at the cut surface. Thin white lines through the muscle = intramuscular fat = flavor and moisture during the long cook. More marbling beats less marbling almost every time.
Color
Beef should be deep red, not gray-pink. Pork should be pink-rose, not pale. Old meat looks faded.
Fat cap
For brisket-style cooks, you want at least 1/4″ of fat cap on at least one side. Some butchers trim aggressively and leave you with bare meat — bring this back to the counter.
Floppy vs firm
A whole brisket should bend slightly when you pick it up by one end. A board-stiff brisket is over-aged or under-marbled. A chuck roast should feel solid but pliable.
Wet but not soaked
Some moisture in the package is normal. A pool of dark liquid means the meat has been sitting too long.
Trim and prep (the part that determines success)
Trim
- Brisket: trim the hard fat down to 1/4″ on the fat cap side. Remove the silver skin from the meat side. Square off the edges so the bark forms evenly. Save the trim — it makes incredible chili or burgers.
- Chuck: minimal trim. Maybe remove some loose fat. The marbling does the work.
- Bottom round: remove the silver skin (it’s tough and doesn’t render). Trim only fat that’s clearly inedible.
- Pork shoulder: minimal. Score the fat cap if it’s thick, but don’t remove it.
Rub
Salt + pepper + maybe garlic powder is genuinely all you need. Most “brisket rubs” with 14 ingredients hide the meat instead of enhancing it. The famous Texas style is just kosher salt and coarse black pepper, in equal parts. That’s it.
Apply 8 hours before cooking if you can — overnight in the fridge. Or 30 minutes ahead if you can’t. Skipping this step or rubbing immediately before the cook leaves you with surface-only seasoning.
Bring to room temperature before cooking
Pull the meat from the fridge 1–2 hours before it goes on the smoker. A cold-from-the-fridge brisket cooks unevenly and adds time. (For the longer setup conversation, see our Charcoal vs Gas vs Pellet guide.)
The cooking process (low and slow, plain English)
- Smoker at 225°F. Stable, no big swings. Pellet smokers handle this automatically; charcoal/wood-burners need attention.
- Place the meat fat-side up. The fat renders down through the meat, basting it as it goes.
- Light wood smoke for the first 4 hours. Hickory, oak, pecan, mesquite (sparingly). Don’t over-smoke or the meat tastes ashy.
- Watch internal temp, not the clock. A meat probe is non-negotiable. Cook to temperature, not to time.
- Wrap if needed. Around 165°F, the temperature climb stalls (the famous “stall”). Wrap in butcher paper or foil to push through. Some pitmasters skip this on full packers; for budget cuts, wrap.
- Pull at the right temperature. Brisket and chuck: 200–205°F. Pork shoulder: 200–205°F (pulled) or 195°F (sliced). Beef cheeks: 200–205°F. The probe should slide in like soft butter.
- Rest. Don’t skip this. Wrap in foil and a towel, place in a cooler, leave for at least 45 minutes — preferably 1–2 hours. The juices redistribute, the meat finishes carryover cooking, the texture sets. Slicing too early is the #1 home-cook mistake.
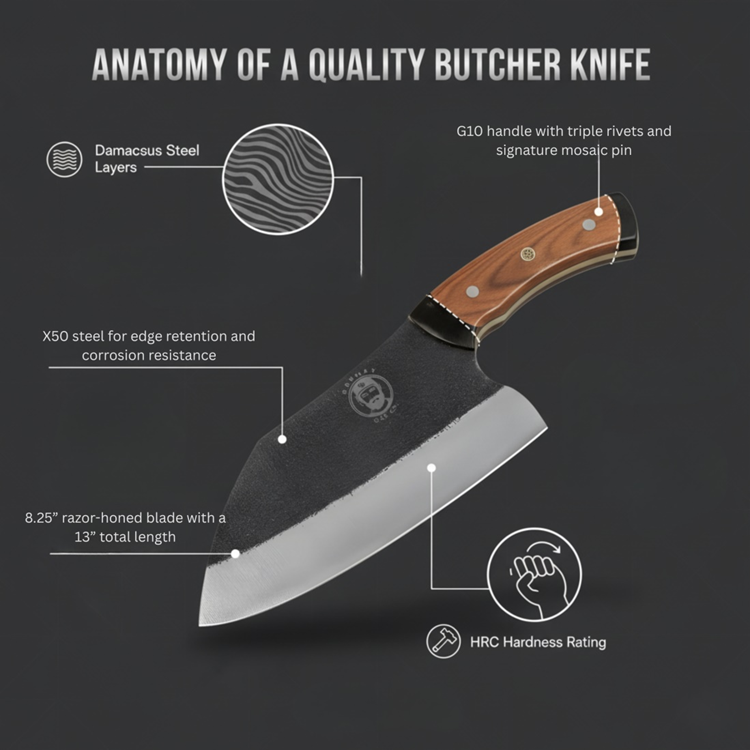
Slicing (the part that earns your knife back)
A long, sharp slicing knife is the difference between professional-looking slices and shredded mess. Bread knives don’t work — the serrations tear muscle fibers. (Covered in our Bread Knife Buyers Guide.) A 12″ smooth-edged slicer or carving knife is the right tool.
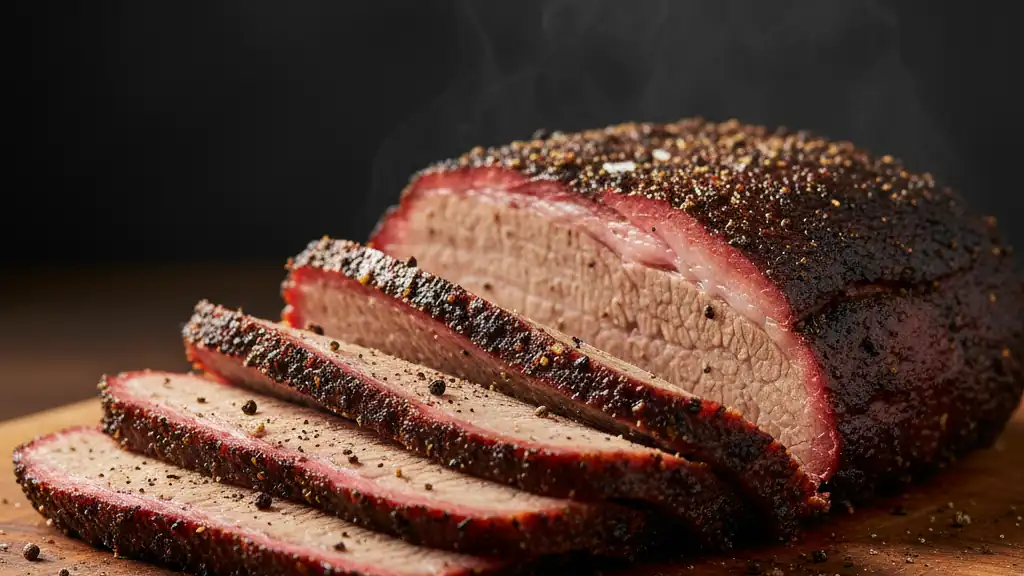
- Always slice against the grain. Grain runs differently in the flat (front-to-back) vs the point (perpendicular). Identify the grain before you slice — pencil-width slices, perpendicular to the muscle fibers.
- Pencil-thick slices for brisket flat. About 1/4″ thick.
- Cube the point for burnt ends. Toss in BBQ sauce, return to smoker for 30 minutes.
- For chuck, cheeks, pork shoulder: chunk or pull rather than slice. The texture invites tearing.
The cost-comparison reality
| Cut | Price/lb | Typical Size | Total Cost | Servings |
|---|---|---|---|---|
| Prime brisket packer | $8–$12 | 14 lbs | $112–$168 | 14–18 |
| Choice brisket flat | $5–$8 | 4–6 lbs | $20–$48 | 6–10 |
| Chuck roast | $5–$7 | 3–5 lbs | $15–$35 | 5–8 |
| Bottom round | $4–$6 | 3–5 lbs | $12–$30 | 5–8 |
| Beef cheeks | $7–$10 | 2–4 lbs | $14–$40 | 4–8 |
| Pork shoulder | $3–$5 | 6–10 lbs | $18–$50 | 10–16 |
Per-serving cost on a chuck roast or pork shoulder is often half of full brisket — and the cooking time is shorter, the failure rate is lower, and the leftovers reheat better.
Marketing traps to avoid
- “Prime grade only” claims at premium markup. USDA prime is genuinely better than choice for brisket — but the gap is smaller than the price gap. Choice on sale beats prime at full price.
- “Wagyu brisket” at $20–$30 per pound. The marbling is real. The price increase is bigger than the flavor difference for backyard cooking. Wagyu shines in shorter cooks (steak) where the fat doesn’t render as completely.
- “Hand-trimmed brisket” with a $2/lb premium. You can trim a brisket yourself in 10 minutes with a sharp boning or chef’s knife. Pay for whole-cut and trim it yourself.
- “Brisket rub” at $15 a jar. Salt, pepper, and garlic powder cost $4 total. Most premium rubs are 90% cheap-spice filler.
- “Smoke flavor liquid drops.” If you’re using a smoker, you don’t need liquid smoke. If you’re cooking inside without a smoker, liquid smoke is a real ingredient — but it’s a $5 bottle, not a $30 specialty.
- “Pellet brand X gives a deeper smoke ring.” The smoke ring depends on smoke chemistry and meat surface moisture, not pellet brand. Standard hickory or oak from any reputable brand works fine.
The Grumpy Dad weeknight playbook
Brisket is a Saturday project. For weeknight or smaller occasions, this is the realistic flow:
- Sunday afternoon: 4-pound chuck roast on the smoker at 225°F. Total time: 5–6 hours, mostly hands-off.
- Sunday dinner: sliced or chunked, served with sides. Feeds 4–6 with leftovers.
- Monday/Tuesday: reheated for tacos, sandwiches, or over rice.
- Wednesday: chili made from any remaining bits.
Total cost: $25–$40. Total active cooking time: maybe 90 minutes spread across the day. Total meals: 4 dinners.
Real brisket can wait until you have a Saturday and a reason to celebrate.
Mistakes that ruin budget brisket attempts
- Cooking too fast (above 250°F). Toughens before collagen has time to break down.
- Pulling too early (below 195°F internal). Meat is still tough.
- Skipping the rest. Slicing immediately drains the juices.
- Slicing with the grain instead of against. Tough chewing texture.
- Over-smoking. More than 4–5 hours of heavy smoke turns the meat acrid.
- Trimming all the fat off. The fat cap is what keeps the meat moist during the cook.
- Using a dull or wrong knife to slice. Tears the meat instead of slicing cleanly. Sharpen first (see our Honing vs Sharpening guide).
- Forgetting the meat probe. Guessing temperature is how brisket dies.
If you only remember five things
- Technique matters more than cut. Chuck and pork shoulder cooked properly beat brisket cooked badly.
- Salt and pepper is enough rub. Ignore the 14-ingredient bottles.
- Cook to internal temperature, not to time. Probe is non-negotiable.
- Rest at least 45 minutes. 1–2 hours is better.
- Slice against the grain with a long sharp knife.
FAQ
Can I do brisket in an oven without a smoker?
Yes. 225–250°F oven, on a wire rack over a pan. Add a smoke source (pre-treat the meat with liquid smoke, or use a stovetop smoker with woodchips for the first hour). Won’t have the same bark as a real smoker, but the meat texture is identical. Wrap at 165°F internal. Same internal pull temperature.
Can I do this in a slow cooker or Instant Pot?
Slow cooker: works for chuck and pork shoulder, doesn’t develop bark, no smoke flavor unless you add liquid smoke or sear first. Instant Pot: too fast for proper collagen breakdown — the meat tenderizes but doesn’t develop the same texture or flavor depth. Both are fallbacks, not first choices.
Why does my brisket always come out dry?
Three usual culprits: cooked too fast, pulled too early, didn’t rest. The fix: drop temp to 225°F, push internal to 200–205°F, rest at least 1 hour. Adding moisture (wrapping with broth in butcher paper) helps for budget cuts.
What’s the difference between a smoke ring and burnt meat?
Smoke ring: pink ring just under the bark, caused by smoke gases reacting with myoglobin. Looks impressive, doesn’t change flavor. Burnt meat: black, dry, acrid. Burnt ≠ smoke. Smoke rings happen at low temperatures with cool meat and proper humidity.
Are budget cuts safe to leave on the smoker for 8+ hours?
Yes — any cut held above 140°F is in the food-safe zone. Below 140°F (the “danger zone”) is when bacteria multiply. As long as the meat reaches 140°F within 4 hours of starting and stays there until pull, it’s safe. Internal temp probe confirms.
Can I freeze cooked brisket-style meat?
Absolutely. Slice or chunk first, freeze in vacuum-sealed bags or freezer bags with air pressed out. Reheats well in a low oven (250°F covered with foil) or sous vide bag. Lasts 2–3 months without quality loss.
The Grumpy Dad Promise
Skip the $130 prime packer. Pick up a $25 chuck roast or a $30 brisket flat. Apply real technique — low heat, long time, salt and pepper, internal probe, hour-long rest, sharp slicing knife. Result: brisket-quality meal at a fraction of the cost, with a fraction of the failure risk.
Brisket is a Saturday-special, not a weekly habit. Most weekends are chuck-roast weekends. Cook accordingly. Now go fire up something that didn’t bankrupt you.