Memorial Day BBQ: The Cuts, the Timing, the Method
Memorial Day is the real opener.
Easter weekend is a warmup — maybe 10 or 12 people, family, afternoon, something manageable. Memorial Day is different. Memorial Day is the first full-size cookout of the year. The crowd is bigger, the expectations are higher, and the grill has been running long enough that you should know what it’s doing by now.
This is the guide for running that day correctly — from choosing the right cuts to timing the cook so you’re not standing at a cold grill when everyone’s hungry, and nobody’s waiting an hour for ribs while eating warm beer and chips.
Choosing What to Cook
The biggest mistake at a Memorial Day cookout is trying to cook everything.
There’s usually a moment — sometime in March or early April — where a host starts mentally adding things to the menu. Burgers. Ribs. Brisket. Hot dogs. Chicken. Wings. Corn. It grows. By the time the weekend arrives, the plan requires three grills, four hours of active cooking, and a timeline that depends on things starting on time.
Nothing starts on time.
The better approach: one signature cut, done well, plus one or two supporting items that are fast and reliable.
Pick one of the following as your centerpiece. Everything else is logistics.
The Centerpice Cuts
Option One: St. Louis Ribs (The Crowd Pleaser)
St. Louis-style ribs are the right call for a large, mixed crowd. They’re universally understood. They’re forgiving on timing — a few minutes over or under doesn’t ruin them the way it does a steak. They look like a BBQ. They photograph well, which apparently matters now.
What to buy: St. Louis-style pork ribs, which are spare ribs with the brisket bone and cartilage trimmed off into a more uniform rectangle. More consistent thickness means more even cooking. Budget one full rack (about 2.5 lbs trimmed) per 2 to 3 hungry adults. For a party of 12: four to five racks.
The rub: Apply the night before. A basic dry rub — kosher salt, black pepper, brown sugar, smoked paprika, garlic powder, onion powder, a pinch of cayenne — covers the entire surface. Wrap in plastic and refrigerate. Taking them directly from the fridge to the grill is fine; the slow warm-up during the first part of the cook isn’t a problem.
The method — 3-2-1:
– 3 hours at 225°F to 250°F, indirect heat, unwrapped
– 2 hours wrapped in foil with a splash of apple juice or apple cider vinegar
– 1 hour unwrapped, sauced in the final 30 minutes if you sauce
This 6-hour timeline starts early. For a 2 p.m. meal, fire starts at 8 a.m. That’s not a typo.
Probe temperature: The ribs are done when they probe tender — the probe slides in with no resistance, like pressing into room-temperature butter. That usually corresponds to an internal temperature of 195°F to 203°F. The number matters less than the feel. Pull when it’s tender, not when the timer says 6 hours.
The bend test: Lift one end of the rack with tongs. If the rack bends 45 to 90 degrees in the middle without breaking, the collagen has broken down enough. Done.
Option Two: Smoked Brisket (The Commitment)
Brisket is the longest cook on this list and the one with the most cult following. When it’s done right — a thick, dark bark, a smoke ring, pull-apart tender slices that hold together under a sharp knife — it’s the best thing you can make on a grill. There’s nothing else like it.
It’s also a 12-to-14-hour cook for a full packer brisket. If you’re doing brisket for Memorial Day, you’re starting Saturday night or 3 a.m. Sunday. That’s the deal.
What to buy: A USDA Choice or Prime full packer brisket (flat + point together), 12 to 16 lbs. Expect it to lose 30 to 40% of its weight during the cook.
The trim: Trim the hard fat cap to approximately 1/4 inch. Remove the thick hard fat between the flat and point. Leave the soft fat. This is where a sharp boning knife or stiff chef’s knife earns its place — trimming brisket with a dull blade is a wrestling match.
The rub: Coarse black pepper and kosher salt, roughly equal parts. That’s the Central Texas approach, and it’s correct for the cut. The beef should taste like beef. The bark should taste like smoke and pepper.
The cook: 225°F to 250°F, fat cap up or down depending on your smoker/grill configuration (fat cap up for offset smokers and most charcoal setups, fat cap down for direct-heat configurations) — if you’re still deciding on your setup, the charcoal vs. gas vs. pellet honest breakdown is worth reading before you commit. Oak or hickory for smoke wood. The stall — a plateau where the internal temperature stops rising around 160°F to 170°F as evaporative cooling takes over — can last 2 to 4 hours. This is normal. Do not panic and raise the temperature. Wait it out or wrap in butcher paper (the “Texas crutch”) to push through.
Probe temperature: Pull at 200°F to 205°F in the thickest part of the flat. The probe should slide in with zero resistance.
Rest time: A minimum of 1 hour, wrapped in butcher paper and towels, placed in a cooler. Two hours is better. Three is fine. A properly rested brisket holds temperature and moisture in a way that resting it on a cutting board does not. The cooler hold is not optional — it’s part of the cook.
The slice: Always against the grain. The flat and point have different grain directions; identify each section before slicing. A long, sharp slicing knife or a good 10″ chef’s knife. Slices should be approximately pencil-width. If they fall apart, the brisket is slightly over — still delicious. If they hold together under significant pressure, it needed more time.
Option Three: Tri-Tip (The Efficient Choice)
Tri-tip is the West Coast’s answer to brisket — a triangular cut from the bottom sirloin that takes 90 minutes to 2 hours and produces a deeply flavorful, beefy result that feeds a crowd efficiently.
It’s the right call when you want the centerpiece to be beef but can’t commit to a full brisket schedule.
What to buy: Whole tri-tip roast, 2 to 3 lbs. One feeds 4 to 5 people generously; buy multiple.
The method — reverse sear: 225°F indirect until the internal temperature reaches 115°F to 120°F (about 45 minutes to an hour). Then move to screaming-hot direct heat and sear all sides — 2 to 3 minutes per side until a deep brown crust forms. Pull at 130°F (medium-rare) to 135°F (medium). Rest 15 minutes.
The result is edge-to-edge even cooking with a crust that competes with any seared steak.
The slice: Tri-tip has a grain direction that changes in the middle of the cut. Find the center point where the grains diverge and cut the roast in two there. Then slice each half against its respective grain. This is not optional — sliced with the grain, tri-tip is tough. Against the grain, it’s tender.
The Supporting Cast
Two or three sides that cook fast and don’t require constant attention are what make a cookout actually enjoyable to host.
Corn on the cob: Soak in the husks for 30 minutes, grill in the husks for 15 to 20 minutes over medium heat. The husks steam the corn while the outer layers char. Peel, butter, serve. Fifteen seconds of prep, no monitoring required.
Halved vegetables: Zucchini, bell peppers, red onion, asparagus — cut and tossed in olive oil, salt, and pepper. Direct medium heat, 4 to 5 minutes per side. Start when the main protein goes on its final stage.
Smash burgers: If you have a crowd that skews toward kids or toward people who will eat anything as long as it comes in a bun, smash burgers on a cast iron skillet at the side of the grill are the fastest, most reliable crowd feeder in the playbook. 80/20 ground beef, loosely formed balls, pressed hard onto screaming-hot cast iron, 2 minutes per side. American cheese, potato rolls. Done.
The Timing Sheet
The biggest stress point of any large cookout is timing — having everything ready at the same time without burning one thing while another sits cold. (If you’ve made the classic slip-ups before, the 10 grilling mistakes dads make is a fast read worth doing before the fire starts.) Here’s how to think about it:
For ribs as the centerpiece:
– 8:00 a.m. — Fire on, grill at 225°F–250°F
– 8:30 a.m. — Ribs on, unwrapped
– 11:30 a.m. — Ribs into foil
– 1:30 p.m. — Ribs out of foil, sauce on
– 2:00 p.m. — Ribs done, resting while you cook sides
– 2:20 p.m. — Everything hits the table
For brisket:
– 9:00 p.m. (night before) — Fire on, brisket goes on
– 9:00 a.m. (morning of) — Check internal temp, push through the stall
– 11:00 a.m. to 1:00 p.m. — Pull at 203°F, rest in cooler
– 2:00 p.m. — Slice and serve
For tri-tip:
– 12:00 p.m. — Fire on, tri-tip in at 225°F indirect
– 1:00 p.m. — Tri-tip hits target temp, crank heat
– 1:15 p.m. — Sear, pull, rest
– 1:30 p.m. — Slice and serve
Write it down. Put it on the fridge the night before. The timer on your phone is doing double duty and something always comes up — a written timeline on paper stays where you left it.
The Tools You Need
A probe thermometer — The single most important tool for any of these cooks. The MEATER Plus gives you internal temp, ambient grill temp, estimated time to target, and a phone alert when it’s done. For a 12-hour brisket or a 6-hour rib cook, the ability to monitor temperature from inside the house without opening the lid is not a convenience. It changes the cook.
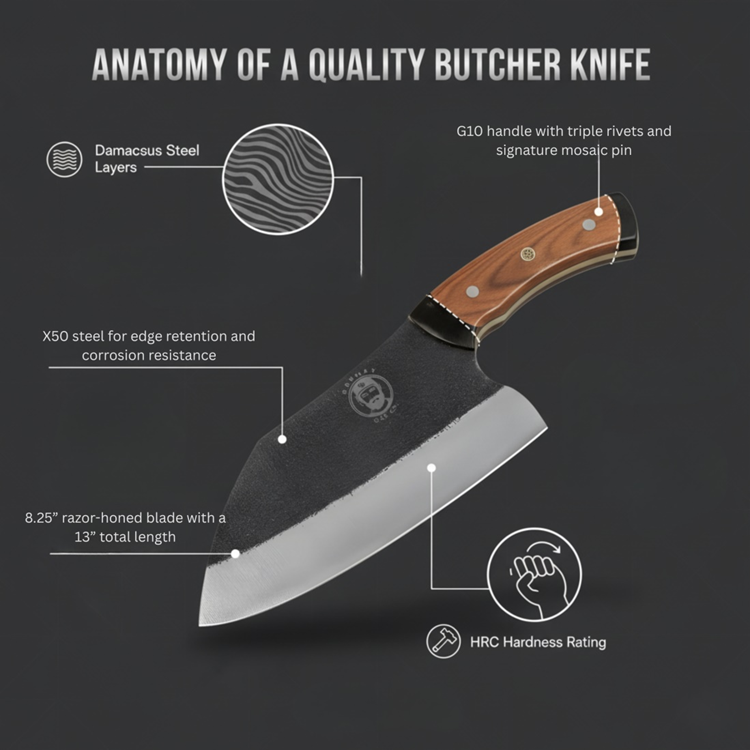
A good sharp knife for carving — A brisket or tri-tip carved with a dull blade shreds rather than slices. You lose juice, you lose presentation, you produce a pile rather than a platter. The Grumpy Dad Heavy-Duty Butcher Knife is 8.25 inches of X50 steel with a handle that fits a hand that’s been managing a fire for six hours. It cuts what it’s supposed to cut.
A bristle-free grill brush — Pre-cook and post-cook. Start clean, end clean. The bristle-free replaceable grill scraper handles both passes without leaving wire bristles in your food.
Foil and butcher paper — For the brisket wrap and the rest. Standard foil works. Pink butcher paper is the brisket traditional choice — it breathes slightly, which prevents the bark from going too soft during the rest. And if you’re running any of these cooks on a Traeger Pro 22 pellet grill, the set-and-hold temperature control makes the long cooks significantly easier to manage.
The Part Nobody Talks About
The best Memorial Day cookout isn’t the one with the most impressive food.
It’s the one where the host is present — outside with the people, not trapped at the grill managing a timeline that requires full attention. The goal of all this planning and timing and probe thermometer usage is to get you out of the cook-management business and into the backyard-hosting business.
Set the ribs. Set the probe. Let the grill and the timer do what they’re supposed to do. Go have a conversation. Come back when the phone alerts. Adjust if needed. Leave again.
That’s the point. Good tools exist so you can trust the process. Trust the process so you can be somewhere other than over a fire for six hours.
The food will be better for the attention you gave it in the planning. The day will be better for the attention you give the people who showed up for it.
Grumpy Dad Co. — Good fire. Right tools. Present for the people around it.
Browse the full grilling and outdoor cooking collection at grumpydadco.com