How to Butcher a Brisket: The Grumpy Dad’s No-BS Guide
Listen up, weekend warriors. You think you can just waltz into the kitchen and hack away at a brisket like you’re splitting firewood? Think again. Properly butchering a brisket isn’t rocket science, but it ain’t opening a beer can either. Whether you’re trying to impress the neighbors or just tired of your spouse rolling their eyes at your “cooking,” this guide will turn you from a meat-mangling amateur into someone who actually knows what the hell they’re doing.
How to butcher a brisket may seem daunting, but with the right techniques, it can be a straightforward process. By breaking down the brisket into its constituent parts, you can ensure even cooking and better texture.
Key Takeaways (AKA: The Cliff Notes for Impatient Dads)
- Learn the brisket’s anatomy, or keep screwing up forever
- Get the right tools – your rusty butter knife ain’t cutting it
- Master the basic cuts without losing a finger
- Trim fat like you mean it, not like you’re afraid of it
- Stop wasting money on pre-cut garbage when you can do it better yourself
Understanding Brisket Basics (Because Knowledge is Power)
Before you go all Rambo on that hunk of beef, you need to understand what makes brisket the king of BBQ cuts. This isn’t some fancy tenderloin that falls apart if you look at it wrong. Brisket comes from the cow’s chest – basically, the pectoral muscles that do all the heavy lifting. That’s why it’s tough as old boots until you treat it right.
What Makes Brisket Special (And Why Your Neighbors Keep Screwing It Up)
Here’s what separates brisket from the amateur-hour steaks your buddy Dave keeps burning: connective tissue. Lots of it. That stringy, chewy stuff that makes beginners want to throw in the towel? That’s actually liquid gold when you know what you’re doing. Break it down slow and low, and it turns into fork-tender heaven. Rush it like an impatient teenager, and you’ll be chewing rubber.
The Point and the Flat: Brisket Anatomy for Dummies
Every brisket has two main parts, and if you don’t know the difference, you’re already behind the eight ball:
The Point: This is the fatty, marbled end that looks like it’s been hitting the gym and the buffet. It’s got more fat than a reality TV show, which means more flavor and forgiveness when you inevitably screw something up.
Mastering the anatomy of brisket not only enhances your how to butcher a brisket skills but also allows you to choose the right cooking method for each part, ensuring a more enjoyable dining experience.
Essential Tools (Stop Using Kitchen Scissors, For Pete’s Sake)
To master the art of how to butcher a brisket, it’s crucial to have the essential tools at your disposal. How to butcher a brisket is not just about cutting meat; it’s about precision, patience, and using the right equipment to achieve the best results.
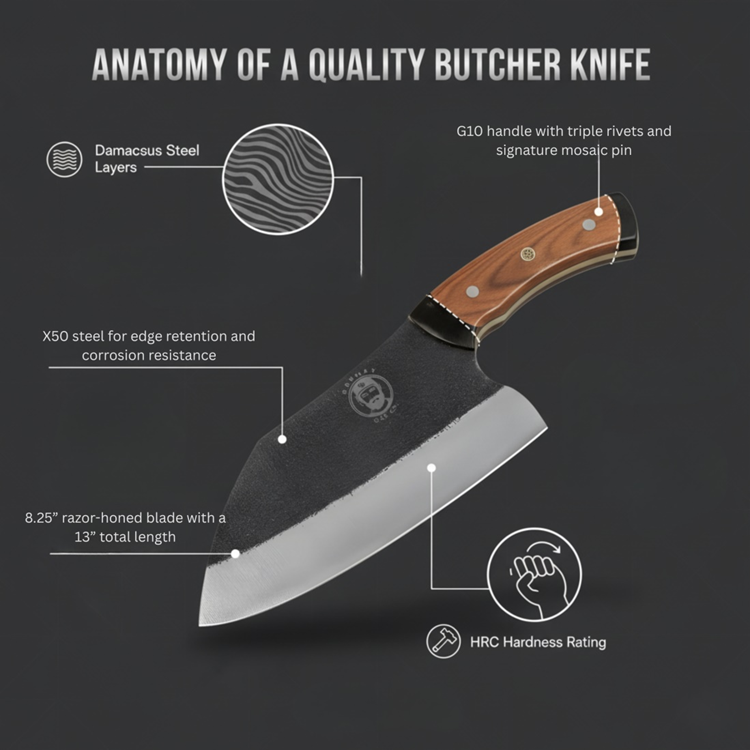
The Right Knife (Finally, Something Sharp Besides Your Wit)
Get yourself a proper butcher knife with a long, flexible blade. Not the one you’ve been using to open Amazon packages. We’re talking about a knife that can handle both delicate work and serious meat separation. A good boning knife or slicing knife will be your new best friend – more reliable than your golf buddies and twice as useful.
Other Tools That’ll Save Your Bacon (And Your Brisket)
Cutting Boards That Won’t Slide Around Like a Greased Pig
Invest in a large cutting board that’s actually big enough for the job. None of that tiny decorative nonsense your spouse bought because it “looked cute.” Get something substantial with a non-slip surface so you’re not chasing your brisket around the counter like a Three Stooges sketch.
A Scale That Actually Works
Time to ditch the bathroom scale you’ve been avoiding. Get a proper digital kitchen scale to weigh your brisket before and after trimming. Knowledge is power, and knowing exactly what you’re working with beats guessing every time.
| Tool | What It’s Actually For |
| Boning Knife | Separating muscles without butchering the job |
| Slicing Knife | Clean cuts that don’t look like a beaver attack |
| Digital Scale | Knowing what you’re dealing with (unlike your teenager’s attitude) |
| Cutting Board | A stable work surface (revolutionary concept) |
By equipping yourself with these essential tools, you’ll be well on your way to becoming proficient in how to butcher a brisket, following expert brisket trimming tips for a successful tutorial.
Selecting the Perfect Brisket (Don’t Get Suckered)
Time for some straight talk about picking brisket. The grocery store isn’t trying to do you any favors, and that “manager’s special” probably isn’t as special as they want you to think.
Prime, Choice, or Select: Don’t Get Played by Marketing
The USDA grades beef for a reason, and understanding the difference will save you from serving shoe leather to your family:
- Prime: The good stuff. More marbling than a fancy bathroom, which means tender and juicy results. Costs more, but so does therapy after serving garbage brisket.
- Choice: The middle ground. Still has decent marbling and won’t break the bank or your marriage.
- Select: The bargain bin option. Leaner than your high school jeans and about as forgiving. It can work if you know what you’re doing, but why make life harder?
Size Matters (That’s What She Said)
Briskets range from 8 to 20 pounds, and picking the right size isn’t just about feeding people – it’s about not having leftovers until the next presidential election. Figure out how many people you’re actually feeding (not how many said they’re coming – we all know Uncle Bob flakes out).
The Flexibility Test (No, Not That Kind)
Here’s a pro move: gently bend that brisket. It should have some give without feeling like overcooked pasta. Too stiff? It might be freezer-burned. Too floppy? It might be past its prime. Trust your hands – they’ve been disappointing people for years, but they know meat.
Preparing Your Workspace (Organization for the Organizationally Challenged)
Before you start hacking away like a serial killer, set up your workspace like you actually have a clue. A messy workspace leads to messy results, and nobody wants to explain blood splatter patterns to the neighbors.
Clean Space = Clean Conscience
Clear off that counter that’s been collecting mail and random tools since the Clinton administration. You need room to work, and that means actual counter space, not a two-inch strip next to the coffee maker. Clean everything twice – once for the germs, once for your peace of mind.
Food Safety (Because Food Poisoning Isn’t Manly)
Adhering to food safety practices is paramount. This includes washing your hands thoroughly before and after handling the brisket, using separate cutting boards for different tasks, and ensuring your tools are clean and sanitized.
By following these brisket preparation steps, you’ll not only improve your how to butcher a brisket skills but also ensure a safe cooking experience.
How to Butcher a Brisket: The Step-by-Step “Don’t Screw This Up” Process
Alright, moment of truth. Time to turn that intimidating hunk of beef into something you can actually work with. Take your time, follow the steps, and resist the urge to rush through it like you’re late for a football game.
Unwrapping and Assessment (Know Your Enemy)
Peel off that plastic like you’re unwrapping Christmas morning, but pay attention. Look for excess fat that needs trimming, weird silver skin that’ll ruin your day, and any other surprises the butcher left you. This is reconnaissance, not a race.
Positioning (Geography Matters)
Fat side up, stable surface, room to maneuver. Position that brisket like you’re setting up a chess board – thoughtfully and with purpose. A brisket that slides around while you’re cutting it is a finger waiting for an accident.
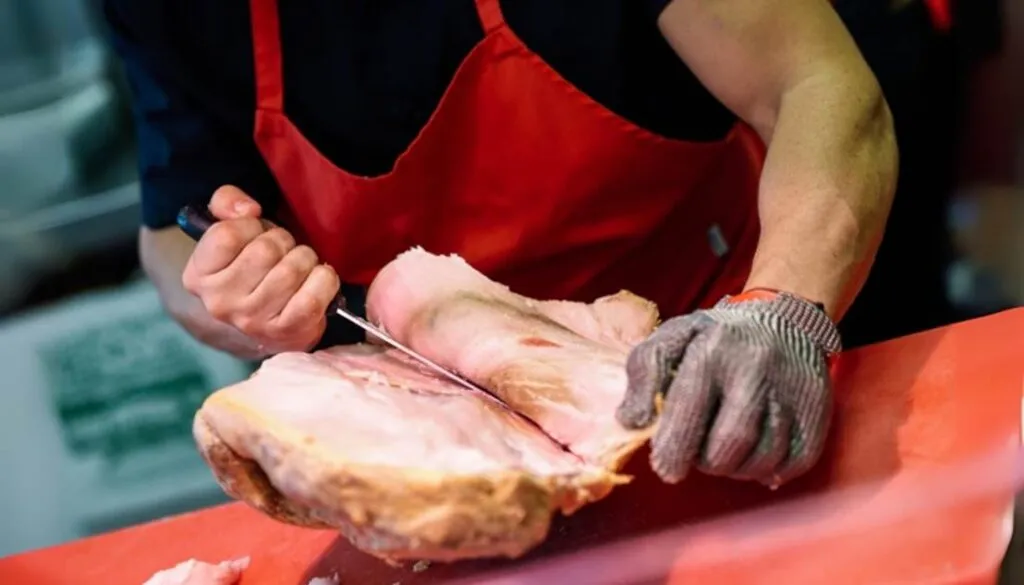
First Cuts (The Moment of Truth)
Find that natural seam between the point and flat – it’s there, even if it’s hiding like your teenager’s work ethic. Use your knife tip to probe around until you find it, then commit to the cut. No hesitation, no second-guessing. Make it clean, make it count.
| Step | What You’re Actually Doing | Pro Tips |
| 1. Unwrapping | Inspecting for problems | Look for silver skin and excess fat |
| 2. Positioning | Setting up for success | Fat side up, stable surface |
| 3. First Cuts | Finding and following the seam | Use the knife tip to locate, then commit |
Follow these steps religiously, and you’ll actually look like you know what you’re doing instead of flailing around like a fish out of water.
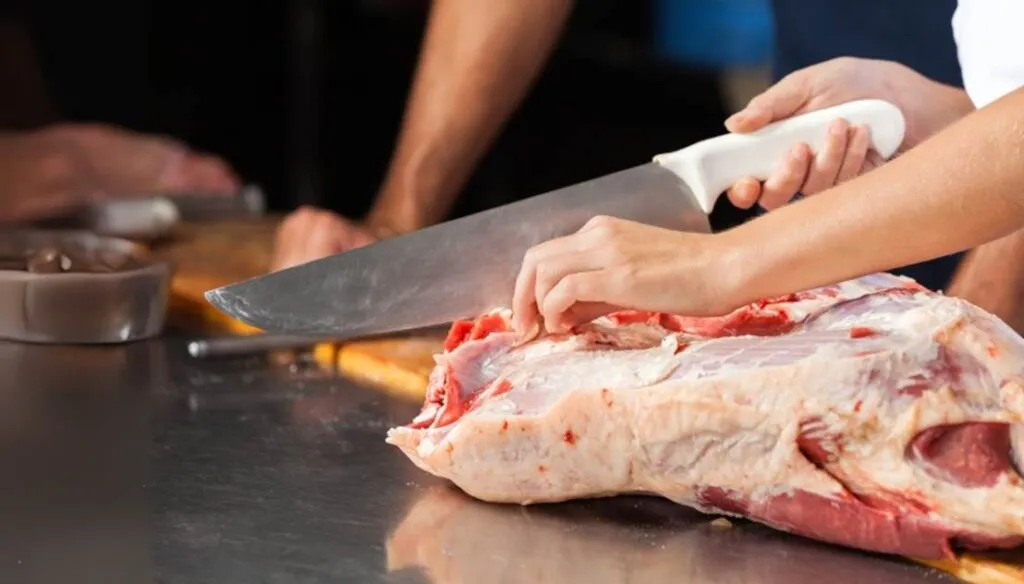
Separating Point from Flat (The Big Leagues)
This is where boys become men and weekend warriors become pitmasters. Separating the point from the flat isn’t about brute force – it’s about finesse, patience, and not losing your temper when things don’t go perfectly.
Finding the Seam (It’s There, Stop Panicking)
That natural seam between muscles is your roadmap. It might not be obvious at first glance, but it’s there. Run your knife tip along the surface until you feel it give way – that’s your entry point. Don’t force it; let the knife do the work.
Slow and Steady (Like Your Dad Always Said)
This isn’t a timed event. Take your time, make deliberate cuts, and don’t get frustrated if it doesn’t look like a YouTube video. Even the pros took years to make it look effortless. Keep steady pressure and follow that seam like your GPS when you’re lost in a bad neighborhood.
Knife Angle Matters (Physics Wasn’t Useless After All)
Hold your knife at a slight angle – not straight down like you’re chopping wood, but angled toward your cutting direction. This helps the blade follow the natural separation and gives you cleaner cuts. Physics class finally pays off.
Finishing Clean (No Hacking Allowed)
Long, smooth strokes win the race. Keep following that seam, maintain your angle, and don’t get impatient at the end. The last few cuts matter just as much as the first ones. A clean separation means you did it right.
Master this technique and you’ll have bragging rights that actually mean something. Mess it up, and you’ll be eating chunky brisket stew instead of proper slices.
Trimming Fat: How Much is Too Much (And How Much Makes You Lazy)
Here’s where most weekend warriors either go overboard or chicken out completely. The fat cap isn’t your enemy, but it’s not your friend either. It’s a tool, and like any tool, you need to know how to use it properly.
The Fat Cap Serves a Purpose (It’s Not Just There to Annoy You)
The fat cap on a brisket can be a blessing or a curse, depending on how you trim it. A well-trimmed brisket is essential for achieving the perfect balance of flavor and texture, whether you’re smoking, braising, or roasting. These brisket trimming tips will help you master this crucial skill.
Strategic Trimming (Finally, a Strategy That Makes Sense)
Get yourself a sharp boning knife and some kitchen shears that actually cut. Start by removing the obvious excess – the chunks that look like they fell off a stick of butter. Leave about 1/4 inch of fat for most cooking methods. It’s like leaving enough beer in the fridge for tomorrow – not too much, not too little.
Different Methods Need Different Approaches (One Size Doesn’t Fit All)
Your trimming strategy should match your cooking method, just like you wouldn’t wear flip-flops to a wedding (we hope):
For Smoking: Leave a thicker cap (1/2 to 1 inch) because that long, slow cook needs all the help it can get.
For Braising/Roasting: Trim it down (1/8 to 1/4 inch) because you don’t want to be swimming in grease.
| Cooking Method | Fat Cap Thickness | Why |
| Smoking | 1/2 to 1 inch | Long cooking needs moisture protection |
| Braising/Roasting | 1/8 to 1/4 inch | Shorter cook, less grease needed |
By mastering the art of fat trimming with these brisket trimming tips, you’ll be able to achieve perfectly cooked brisket every time, regardless of your preferred cooking method.
Dealing with the Tough Stuff: Deckle and Silver Skin (The Real Villains)
Mastering brisket butchery involves understanding how to handle tough connective tissues like deckle and silver skin. These elements can significantly impact the final texture and flavor of your brisket dishes. Following proper brisket trimming tips is essential for handling these challenging components.
Know Your Enemy (Identification for Dummies)
Deckle: That thick layer of fat and tough connective tissue that looks like it’s wearing armor. It’s tougher than your last performance review and twice as unforgiving.
Silver Skin: The thin, silvery membrane that clings to the muscle like plastic wrap from hell. Looks innocent, chews like rubber.
Removal Techniques That Actually Work
To remove the deckle, use a sharp knife to carefully cut along the natural seam between the deckle and the meat. For silver skin, slide your knife under the membrane and gently pry it away from the muscle. These brisket trimming tips ensure clean removal without damaging the meat.
| Tissue Type | Removal Strategy | Pro Tip |
| Deckle | Cut along natural seam | Sharp knife, steady pressure |
| Silver Skin | Slide under and peel | Angle the blade up slightly |
When to Leave Well Enough Alone
Sometimes the best move is knowing when to quit. If you’re slow-cooking that brisket for hours, some of that connective tissue will break down and add flavor. Don’t be a perfectionist if the cooking method will do the work for you.
Portioning Like a Pro (Making the Most of Your Investment)
Now that you’ve successfully butchered your brisket without looking like a crime scene, it’s time to portion it for whatever cooking method you’ve chosen. Different cooking styles need different cuts, and getting this wrong is like wearing shorts to a funeral – technically possible, but definitely wrong.
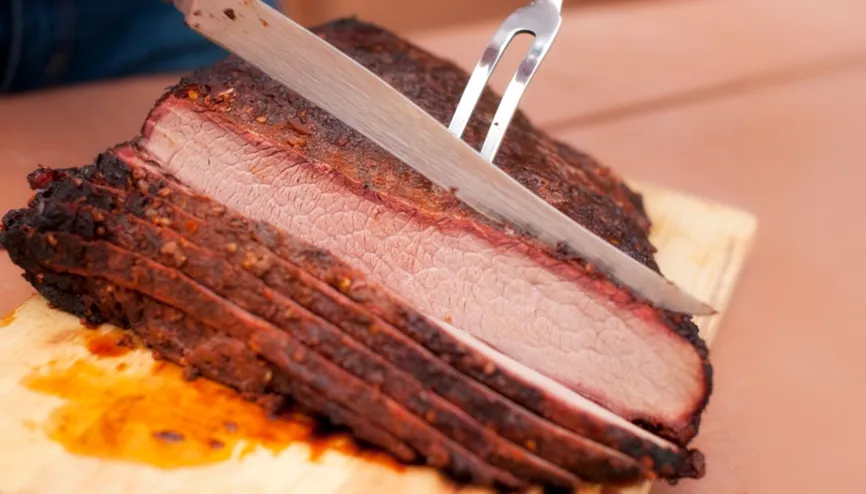
Smoking Cuts (For the Patient and the Proud)
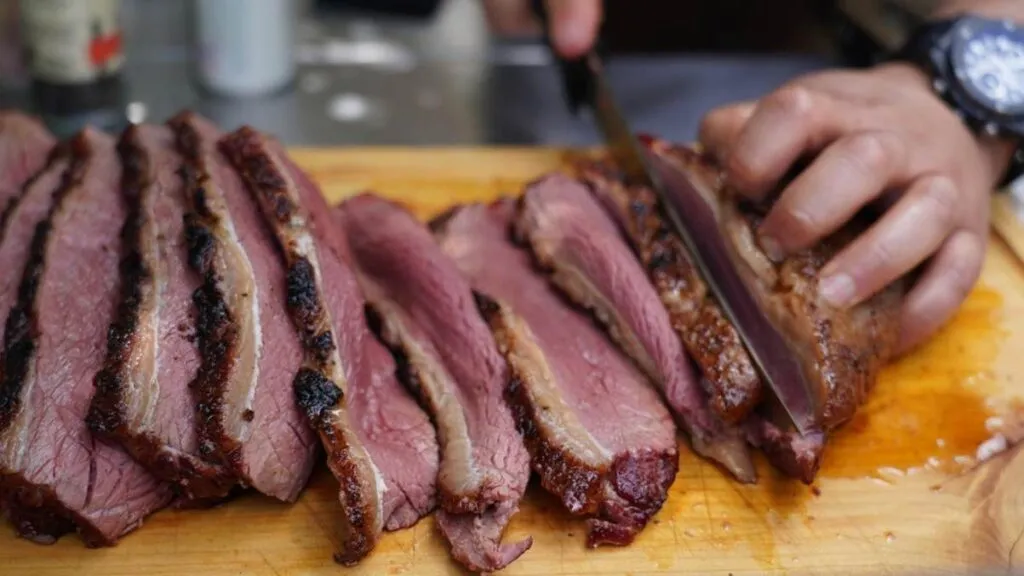
For smoking, the flat cut is often preferred due to its uniform thickness, which allows for even cooking. “Smoking brisket is an art that requires patience and the right cut of meat,” says renowned pitmaster Aaron Franklin. Ensure your brisket is portioned to fit your smoker, and consider the fat cap when deciding how to butcher a brisket for smoking.
Braising Portions (For When You Want to Look Fancy)
The point cut shines in braises because all that fat renders down into liquid gold. Cut against the grain into thick slices, or leave it whole if you’re feeling ambitious. Either way, that extra fat will keep things moist while the slow cooking breaks down all the tough stuff.
Corned Beef and Pastrami Prep (Old School Cool)
For these classics, you can use the whole brisket or separate the cuts – your choice. The key is proper curing before cooking. As Chef Michael Ruhlman puts it: “The secret to great corned beef is in the cure.” Translation: don’t rush the process, and make sure your brisket fits in whatever container you’re using for curing.
Smart portioning means better results and fewer disappointed faces around the dinner table. It’s the difference between looking like you planned everything perfectly and looking like you’re making it up as you go along.
Waste Not, Want Not: Using Every Last Bit (Your Grandfather Would Be Proud)
Real men don’t waste food, especially when they’ve just spent good money on quality beef. Those trimmings aren’t garbage – they’re opportunity. Use them right, and you’ll stretch your dollar further than your belt after Thanksgiving dinner.
Rendering Fat (Liquid Gold, Literally)
That fat you trimmed off? Don’t throw it away like some amateur. Render it down into pure cooking fat that’s better than anything you can buy in a store. Heat it slowly until the fat separates from the tissue, strain it, and you’ve got cooking fat that’ll make everything taste better.
Beef Tallow (The Secret Weapon)

Rendered beef fat becomes tallow – a versatile ingredient that your great-grandmother knew about but somehow got forgotten. Use it for frying, baking, or as a finishing touch that adds serious flavor. It’s like having a secret ingredient that actually works.
Ground Beef from Scraps (Nothing Goes to Waste)
Those meat trimmings can become ground beef for burgers, meatballs, or tacos. It’s fresher than store-bought, and you know exactly what’s in it. Plus, brisket-based ground beef has more flavor than that generic stuff from the grocery store.
Stock and Soup Bones (The Foundation of Everything)
Any bones or really tough trimmings can become the base for rich, flavorful stock. This stuff is liquid gold for soups, stews, and braising liquid. Make a big batch and freeze it – future you will thank present you.
| Trimming | What It Becomes | Best Uses |
| Fat Trimmings | Rendered Fat/Tallow | Cooking, frying, flavor |
| Meat Scraps | Ground Beef | Burgers, meatballs, tacos |
| Bones/Tough Bits | Stock | Soups, stews, braising |
Use everything, waste nothing, and prove you’re not just another wasteful weekend warrior who throws away perfectly good ingredients.
Storage That Doesn’t Suck (Keep Your Investment Fresh)
You’ve done all this work – don’t blow it by storing your brisket like a caveman. Proper storage is the difference between enjoying your handiwork later and explaining to your family why dinner smells like a gym sock.
Wrapping That Actually Works
Heavy-duty aluminum foil or plastic wrap, wrapped tight enough to pass a military inspection. Air is the enemy here – it’ll dry out your meat faster than your last performance review dried up your raise hopes. No gaps, no loose ends, no excuses.
Refrigeration Rules (Temperature Matters)
Below 40°F (4°C) consistently – not the “good enough” temperature your fridge has been running at since the Bush administration. Use it within 3-5 days, and don’t push it just because you hate throwing away food. Better safe than explaining food poisoning to your insurance company.
Freezing for the Long Haul
For longer storage, divide into portions that make sense for your family size. Nobody wants to thaw a 10-pound chunk of brisket for a Tuesday night dinner. Wrap each portion separately, then bag it. Label everything with dates, not just “brisket” – because six months from now, you won’t remember when you put it in there.
Vacuum Sealing (The Professional Move)
If you’ve got a vacuum sealer, use it. Removes air better than any wrapping job and keeps things fresh longer. It’s an investment that pays for itself if you actually use it instead of letting it collect dust like that bread maker.
You’re Ready to Stop Embarrassing Yourself
Now that you’ve made it through this comprehensive guide, you’re well-equipped to tackle this task with confidence. By understanding brisket basics, selecting the perfect cut, and mastering the step-by-step how to butcher a brisket, you’ve gained the skills necessary for mastering brisket butchery.
Remember, the key to success lies in preparation and attention to detail. With your newfound knowledge and brisket trimming tips, you can efficiently separate the point from the flat, trim fat, and portion your brisket for various dishes. Don’t be afraid to experiment with different cooking methods and recipes to make the most of your butchered brisket.
You’ve got the knowledge to separate point from flat, trim fat like you mean it, and portion your brisket for whatever cooking method you choose. More importantly, you know how to use every scrap, so you’re not throwing money away like some kind of trust fund kid.
The difference between you and every other dad who thinks he can cook is that you actually took the time to learn how to do it right. So get out there, pick up a proper brisket, and show everyone that you’re not just another weekend warrior with more enthusiasm than skill.
FAQ (The Questions Every Grumpy Dad Asks)
What’s the best way to butcher a brisket without looking like an amateur?
Understand the anatomy, get proper tools, and follow the step-by-step process. Most importantly, take your time and don’t rush it like you’re late for a golf game.
What tools do I actually need, and which ones are just marketing BS?
A sharp, long-bladed knife is non-negotiable. A proper cutting board that won’t slide around. A digital scale for accuracy. Everything else is nice to have but not essential.
What are the best brisket trimming tips for a perfect cook?
Start by leaving about 1/4 inch of fat on the brisket to keep it moist during cooking. Use a sharp boning knife to carefully remove excess fat without gouging the meat. For smoking, you may want to leave a thicker fat cap (up to 1 inch), while for braising or roasting, 1/8 to 1/4 inch is ideal to avoid greasiness. Don’t forget to remove the silver skin and deckle for better texture and flavor absorption.
How do I pick a brisket that won’t disappoint me?
Look for good marbling (Prime or Choice grade), pick the right weight for your needs, and do the flexibility test. Don’t get suckered by “manager’s specials” that are special for all the wrong reasons.
How much fat should I actually trim?
Depends on your cooking method. For smoking, leave 1/2 to 1 inch. For braising, trim down to 1/4 inch. The fat serves a purpose, but too much makes everything greasy.
What’s the trick to separating the point from the flat?
Find the natural seam between muscles and follow it with steady, deliberate cuts. Don’t force it – let the knife do the work. Patience beats brute force every time.
What mistakes do most dads make when butchering brisket?
Using dull knives, rushing the process, trimming too much or too little fat, and not following the natural seams. Also, throwing away perfectly good trimmings instead of using them.
How can I use the trimmings instead of wasting them?
Render fat for cooking, make ground beef from meat scraps, and use bones for stock. Real men don’t waste food, especially when they paid good money for it.
What’s the best way to store butchered brisket?
Wrap it tight, keep it cold, and use refrigerated brisket within 3-5 days. For longer storage, portion it properly and freeze it. Vacuum sealing is worth the investment if you do this regularly.
Can I freeze brisket after butchering it?
Absolutely. Portion it sensibly, wrap it properly, label it with dates, and it’ll keep for months. Just don’t expect it to last forever in the freezer.
Ready to Stop Being a Weekend Warrior and Start Being a Pitmaster?
You’ve got the knowledge – now get the tools that’ll make you look like you actually know what you’re doing. No more borrowed knives and makeshift cutting boards.
Get Serious About Your Tools – Grab one of our precision butcher knives that’ll cut through brisket like it’s supposed to, not like you’re sawing through cardboard.
Look the Part – Wear our Grumpy Dad Co. T-shirts while you work. If you’re going to sweat over a brisket, might as well look good doing it.
Fuel Up Right – Start your day with coffee in our mugs that won’t break when you inevitably slam them down after reading another terrible online recipe.
Join the Brotherhood of Actually Competent Dads. Follow us for more no-BS advice, real techniques, and proof that you can actually learn something useful:
Facebook: facebook.com/grumpydadco
Instagram: instagram.com/grumpydadco
🔥 Stop making excuses and start making brisket that doesn’t embarrass you – Grumpy Dad style!